If you are using Paint Shop Pro 7 for lineart, there are 3 tools you use: Draw, Flood Fill, and Paintbrush.
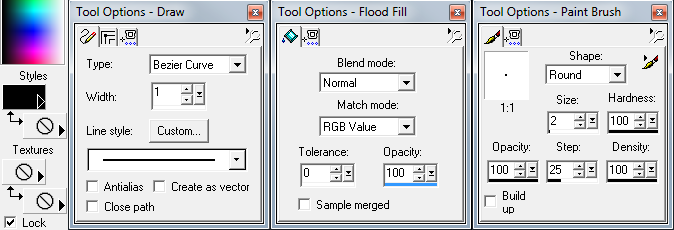
For these, make sure your tool settings exactly match what's below:
(if you do not know how to see/access these, see the "Basics" tutorial)
If you are not using PSP7 for lineart, here's what to keep in mind when using another program:
- Color Palette: The primary color should be solid black.
- Lineart settings: Make sure the line does NOT have anti-alias (AA) enabled. AA smooths the line upon completion, which is not handy for my style, as it impedes on the flood filling stage my lineart undergoes. Also, set the lines to be only 1 pixel wide.
- Flood Fill settings: Set it to match on RGB value and fill with 100% opacity.
- Paint Brush settings: Here, the brush is used to fill in gaps that the flood fill may miss. So, make sure it is a small size (1-2px) and has 100% hardness and opacity.
Also, MAKE SURE YOU ARE IN A NEW RASTER LAYER. Make a new layer by clicking the Layer tab, then "New Raster Layer", then OK (See the Layer tutorial for more info).
Make sure you have EVERYTHING ABOVE before continuing. Here, I am creating what Paint Shop Pro 7 calls a "Bezier curve". My lineart is comprised of many of these curves that together make a continuous trace of the sketch it is laid over top of. To make a bezier curve:
- Click the Draw tool
 on the program's left sidebar.
 - Pick where you want to start and end the line. Left-click, hold down on the button, drag the cursor to where you want the curve to end, and then release the left mouse button. This creates a temporary line that goes directly from point A to point B.
- Now, morph the line into a curve by its 2 endpoints. The program automatically starts with the point that was drawn first. To start shaping that "side" of the curve, left-click, hold, and drag the cursor as needed. Release the button when you're done deforming that side of the line, and then left-click, hold, and drag the other side of the line in place to complete the curve. Release the button to finish. Your goal here is to have the curved line mimic the very edge of sketched line it is going to overlay.
Practice makes perfect. Play around with the tool a bit and it'll become second nature to you. The sketched lineart does not have to be completely followed. If you feel a line would look better another way, it's okay to deviate from the base sketch (I do this all the time).
Keep in mind, with my style, the curved lines are meant to outline only the VERY EDGE of the sketched lines. The space inbetween is filled with the Flood Fill tool
![]() .
.
- Once the lines are continuous, (that is, a flood fill can not "leak out" beyond where it is supposed to go), the gap between the lines on the inside and outside edges are filled in with the flood fill tool . This creates the variance in line width in my art.
- Some renegade pixels will show up as a result of the flood fill not covering every gap within the lines, which can be remedied with the Paintbrush
 if needed.
The example to the left demonstrates all of these things said above. I also added flat coloring to this example to show what will eventually be done with the lineart.
NOTE: If your flood fill does not effectively fill inbetween the lines, you may have not made a new raster layer. If your fill spills over the entire image, you likely missed a tiny gap in the lineart that would allow it to "leak out", which can be common. The lineart must make a completely enclosed area.

Not all of my lineart occupies the same layer, so make sure you are always in the correct layer when doing lineart (see more in the "Layers" tutorial). Why? Because I add layers based on position relative to the viewer, some pieces of lineart will be on different layers of the image (example: hair going in front of a character's eyes would be on a layer above the base character layer, but hair going behind the head would be on a layer behind the base character layer). Why do this? Because it is easier to make adjustments to the lineart/flat coloring when its layered than it is when all of the lineart is in one layer.
The animation to the left shows how I am layering my lineart for this example image. It's a pretty strange way of doing lineart, but I've been doing it this way for years. It has its limitations, namely with the lack of anti-alias, but my images are generally so large in resolution that this issue resolves itself once it is resized for the Internet.